
Tuesday, September 11, 2012
I spent this last weekend with my eldest daughter, Jennelle, and we discovered the art of Zentangle and after some research decided to give it a try. The following is the artwork we created.
 The pens we used were purchased at a rummage sale in Jennelle's subdivision and were drafting pens with very fine points. We each bought a set of these pens and after checking the internet were surprised to find out they were valued at over $100 a set. Jennelle's cost 3$ and I paid only 2$. What a find.
Wednesday, July 18, 2012
MARILYN MONROE PROJECT
I received information about a Marilyn Monroe Mail Art Project taking place in Holland and decided to give it a go. All you had to do was make a piece of art and the subject matter is Marily Monroe. There were not any restrictions so that left the door wide open for any type of artwork.
 Tah Dah!!!

BIG 20 ATC SWAP
There was this swap offered where you create 20 ATCs and get 18 back in return. Soooooo I gave it a try and whew quite a bit of creating going on. Below you will see the cards I made.


 This project is not due until August sometime, but thought I would get a jump on it instead of waiting until the end.

 These are the returns from the Art 42 Big 20 Swap. All in all a pretty successful swap!


Friday, May 18, 2012
Mother's Day Flowers

Monday, May 14, 2012

Monday, May 7, 2012
New JAMS
This first JAM was received from Canada and is in the shape of a little dress. Very interesting. I added the little buttons and the belt and now it is on its way to Florida to be finished.
I was the second artist to work on this JAM and made changes as shown above which included the black dots on edge and some chalk color to the shoe and glove. I have now mailed the cards to PA to be finished.

 This JAM was finished up by me. It had a lot done when it arrived so I just added the corners and then returned it to PA.
 This is a new JAM I am starting because a gal from Canada requested a JAM to work on. I'll post the finished product when It is returned to me.


I was the second artist to work on this JAM and made changes as shown above which included the black dots on edge and some chalk color to the shoe and glove. I have now mailed the cards to PA to be finished.


Monday, April 30, 2012


Monday, April 9, 2012


Friday, March 23, 2012

Monday, March 19, 2012


One More Pinterest Project
So I found yet another interesting piece of artwork on the Pinterest website and had to give it a try. Mine is a tad different, because I actually made most of my petals the same size and used a lot less than the one I used as my example. All in all I am very happy with the results.


Wednesday, March 7, 2012
Flip Flop Hangers.....NAILED IT
These little practical hangers were another idea I found on Pinterest. Not the easiest in the world to make (my hangers were not of the flimsy variety) so it took quite a lot of strength to bend them into shape. All in all, just LOVE them and they do keep my flip flops organized..


Tuesday, March 6, 2012
Burp Cloth Idea from Pinterest
So our first granddaughter will be arriving in just about 14 days and I came across this neat idea to perk up burp cloths. It was a tedious task and I had a little problem with the cloths themselves stretching so things are just a tad less than perfect. All in all I am happy with how they turned out.


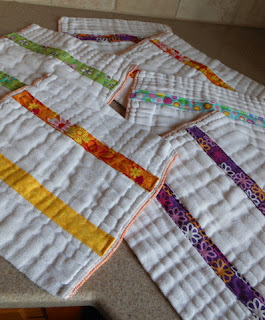


The sample I saw on Pinterest used ribbon for adding the color, I just bought some fabric and made my own colored stripes. Took a little longer, but less expensive than buying ribbon.
Friday, February 24, 2012
Lock and Key Swap


Wednesday, February 22, 2012
Pinterest Repost from "the 3 R's blog"
This is a little paint chip art project I tried and am very happy with. Instead of trying to glue those little strips down, i completely covered my base with double sided tape and went from there. Pretty easy. The thing I had a hard time with was cutting all of those skinny strips. All of them did not turn out perfect, but good enough for my first try.


Saturday, February 18, 2012
Kinda Steampunk from Pinterest
So someone on Pinterest had this wonderful idea of decorating a plastic ball with buttons and various other findings to create a sort of Steampunkish feel decor. The one I saw was made of mostly silver items, which may look better than mine. But, c'mon I did give it a good try.


Tuesday, February 14, 2012
Blue and White ATC Swap


Monday, February 13, 2012
Shades of Red Swap

3/3 swap due on the 20th. This is the second swap in a color series .... a different color each month.

These are returns from the shades of red swap.
Friday, February 10, 2012
Pinterest Project


Using scrapbook paper, I made this piece of artwork. Needs a little twinking, but I am pretty darn happy with it. It was made for a specific room so the colors are a little out there!
My husband picked up a 5-1/2" x 6' board for me and then cut the six squares. I sanded all edges and then painted them a light gray color. After they dried I found some scrapbook papers that kinda worked together. This is perhaps the hardest thing for me - coming out of the box trying to blend papers. The papers were then cut to size and glued to the wood squares using a little "thick and tacky" glue watered down with a tad of water. You have to watch out for bubbles and make sure the edges stay down. Keep checking while they dry.
Once they were all dry, I applied a little sepia colored stamp pad ink to all of the edges to give them an "old" look.
I found a thin 1/4" board in the basement that I used for the background. After cutting it to size I painted the edges and a couple inches on the top before using wood glue attaching the squares to it. Later I decided to sand the edges to rough them up a bit. Last but not least I attached a picture hanger to the back. The end.
Subscribe to:
Posts (Atom)